Importing Subscriptions
If you have existing wine club customers — whether from a spreadsheet, another platform, or a manual wine club — you can import them into the app so they don't have to sign up again individually.
The import creates active subscriptions with future billing dates, so customers are not charged during the import. They continue on their existing billing schedule and are charged automatically when their next billing date arrives.
Payment methods after import
If a customer already has a reusable payment method saved to their Shopify account — matched by email address — the app attaches it to the subscription shortly after the import completes, usually within a minute or two. A reusable payment method is one from a previous subscription (including Shop Pay), or a card the customer has explicitly saved to their account; a card used only for a one-off past order is not stored by Shopify and can't be linked. Anyone without a saved payment method adds one themselves on their Shopify customer account before their first billing date. The app includes a bulk email action you can fire off straight after the import to prompt them, and the standard pre-billing reminders cover anyone who hasn't acted yet.
Before you import
Before starting an import, make sure:
- Your clubs are published — The clubs and frequency/case size combinations you want to import customers into must be published and fully synced with Shopify. See Setting Up Your Wine Club.
- Products are prepared — The products and variants for each club must be available. See Preparing Your Products.
- Your plan has capacity — Your billing plan limits the number of active subscriptions. The import will not proceed if it would exceed your plan's limit. You can check your current usage on the Dashboard.
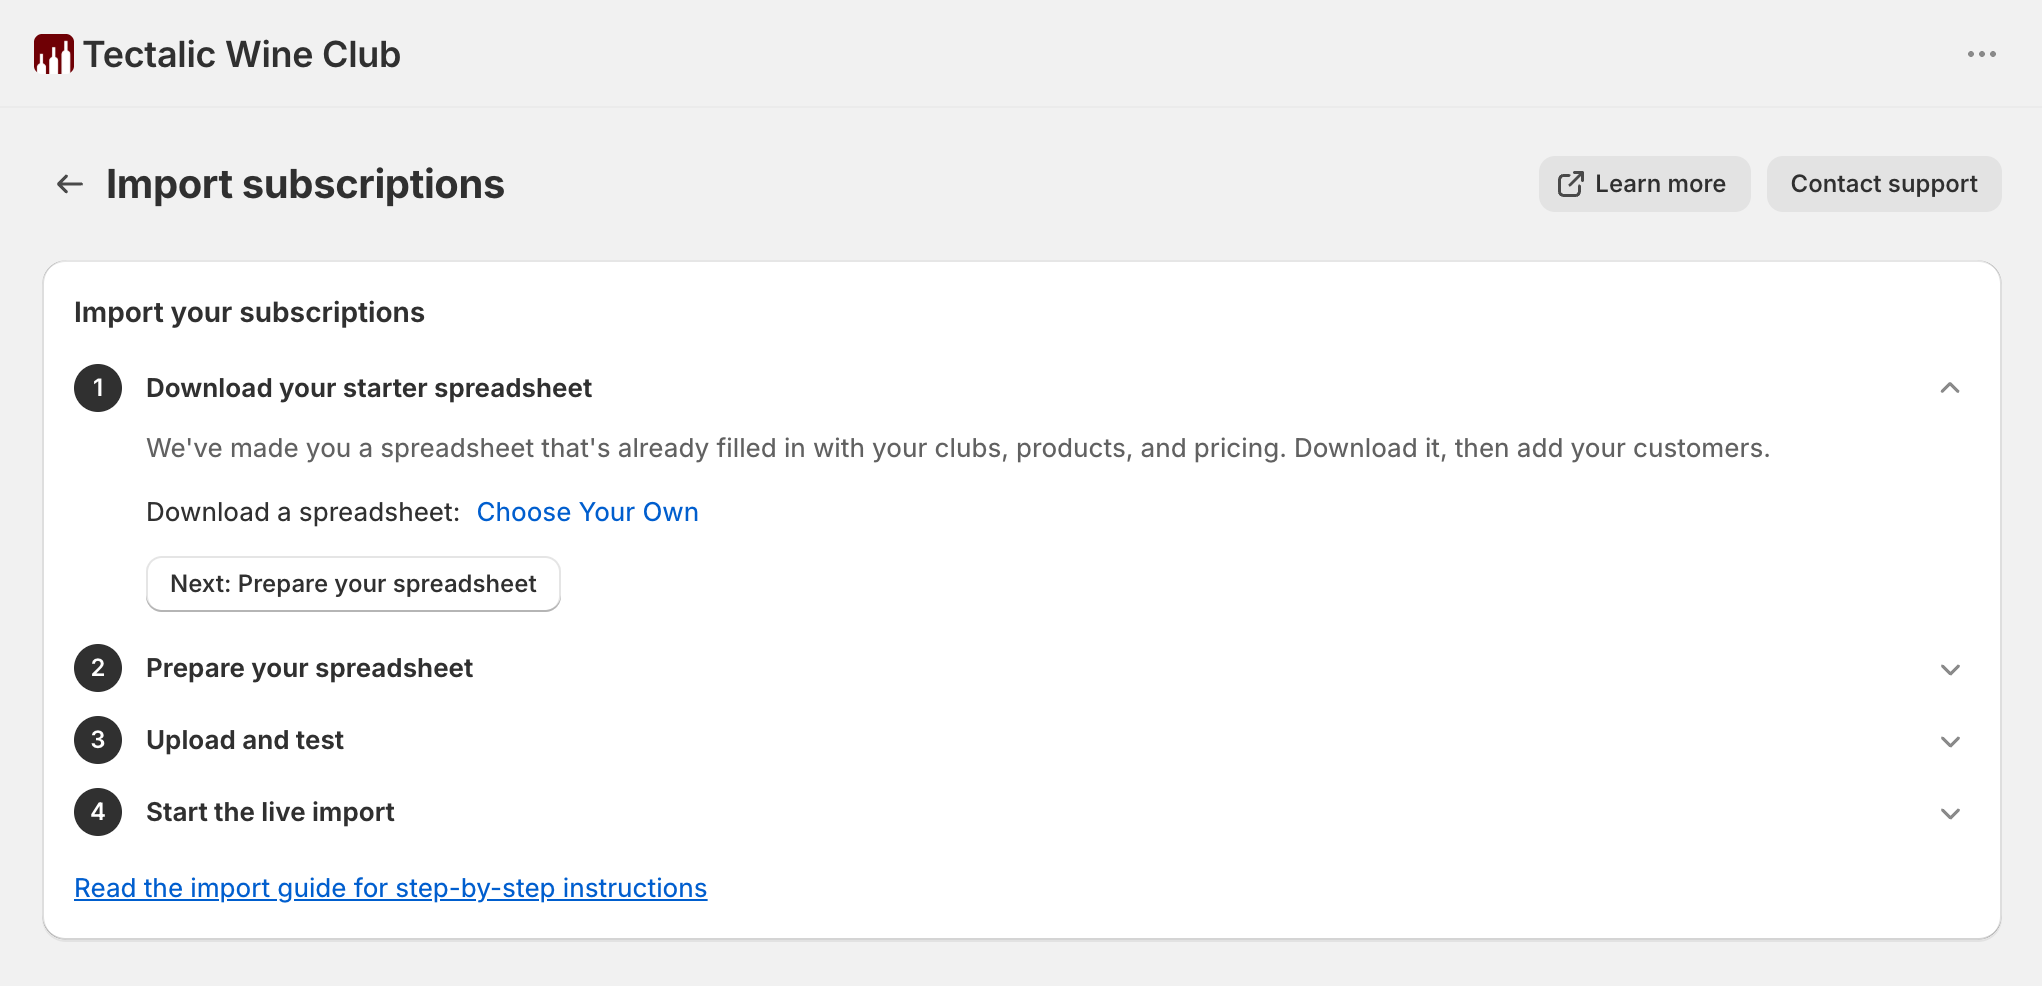
1. Download your starter spreadsheet
In the app, go to Subscriptions → Import and download a template spreadsheet for your club type. Each file can contain up to 100 subscriptions and must include only one club type — all Choose Your Own subscriptions in one file, all Curated in another.
Make sure you pick the right template: there's one for Curated and a different one for Choose Your Own. Each template is pre-filled with your own clubs, products and pricing.
2. Prepare your spreadsheet
Double-check the email column
Use each customer's existing email address — the one they already use with you and on their Shopify account. The app matches customers to their Shopify account by email, so it has to be exact. It's also how they sign in to the customer portal and how they receive every wine club email. An incorrect email blocks all of this, and can only be corrected in Shopify after the import — review the email column carefully before importing.
Open the template in Excel, Google Sheets or any spreadsheet app. Keep the top row that shows each club's name, then fill in the customer details and next billing date. For Choose Your Own clubs, you also specify how many bottles the member has chosen of each wine, alongside the wine name and its pre-filled price.
Click the tab below matching your club type for step-by-step instructions and a column reference.
For Choose Your Own subscriptions, every wine the customer can pick is listed as a separate row, all sharing the same handle. The first row for a handle — the top row, which shows the club name — carries the customer and club details; the remaining rows only need the handle and line item columns.
Filling in the template for each subscriber:
- The template includes a block of rows for each Choose Your Own club — one row per wine in the club, all sharing the same
handlelikesubscription-1. Decide which club each subscriber is in. - For every subscriber, copy that club's full block of rows to the bottom of the spreadsheet and change the
handleto a unique value (e.g.sub-001,sub-002). The importer groups rows byhandle, so each subscriber needs their own. - In each subscriber's block, set
line_quantityfor each wine the customer should receive. Leave a row'sline_quantityat0(or delete the row) for wines they're not subscribing to. The quantities across all rows in the subscription must add up to the club's case size (e.g. 6 or 12 bottles). - Adjust
line_priceif you've agreed a custom per-bottle price with the customer. The default is the standard club price for that wine. Each wine you're keeping needs a price greater than zero — a blank or0price is flagged so you can correct it. - On the top row of each subscriber's block — the row that shows the club name — fill in the customer details (
email,first_name,last_name, address,phone),next_billing_date, and thetotal_pricethey pay (see the note below). The block's other rows only need their line item columns. Adjustdelivery_methodanddelivery_priceif the customer collects in person or pays a delivery fee. - Once every subscriber has their own block, delete the original template blocks so they aren't imported as empty subscriptions.
Prices in the template are the discounted club prices (retail price × club discount), not the underlying retail price.
line_price is per bottle — put total_price on the top row only
line_price is always the price of a single bottle, never a line total or the order total. The total the member pays — every line_quantity × line_price added up, plus delivery_price — goes in total_price. Because it's a column it's tempting to fill it in on every row, but only the top row of each subscription (the row that shows the club name) is read; values on the other rows are ignored. The Choose Your Own template leaves total_price blank, so you work it out and enter it yourself. If it doesn't match the bottles plus delivery, the test results show a warning but still let the import go ahead.
| Column | Description | Example |
|---|---|---|
handle |
Groups rows into one subscription — all rows with the same handle belong to the same subscription | sub-001 |
email |
Customer's email address | jane@example.com |
first_name |
Customer's first name | Jane |
last_name |
Customer's last name | Smith |
club_group |
Club group name (must match an existing club group) | Premium Reds |
club |
Club name — the specific frequency and case size offering (must match an existing club) | 6 Bottles Quarterly |
next_billing_date |
Next billing date in YYYY-MM-DD format. Interpreted as midday in your store's timezone. Must be at least 48 hours in the future and no more than one billing interval ahead — up to 1 month for monthly clubs, 3 months for quarterly, 6 months for 6-monthly, and 12 months for annual. |
2026-07-01 |
delivery_method |
Delivery method: shipping, local_delivery, or pickup. Downloaded templates default to shipping. |
shipping |
delivery_price |
Delivery price each cycle. Downloaded templates default to 0 (free delivery). Use 0 for pickup. |
15.00 |
address1 |
Street address | 42 Vine Street |
address2 |
Apartment, unit, or suite number (optional) | |
city |
City or suburb | Barossa Valley |
province_code |
State or province code | SA |
country_code |
Two-letter country code | AU |
zip |
Postal or ZIP code | 5352 |
phone |
Phone number in international format | +61400000000 |
company |
Company name (optional) | |
line_product |
Identifies the wine for each line item. You can use either:
|
2023 Barossa Shiraz |
line_quantity |
How many bottles of this wine the customer receives each cycle. Set to 0 (or delete the row) for wines they're not subscribing to. Quantities across all rows in the subscription must add up to the club's case size. |
3 |
line_price |
The discounted price for a single bottle (not a line total) that the customer is billed each cycle. For wines the customer is receiving, this must be greater than zero — a blank or 0 price is flagged in the test results. Downloaded templates pre-fill this with the standard club price for each wine. If you change it to less than the variant's retail, the difference is recorded as the per-cycle discount and shown alongside retail in the customer portal. |
25.00 (per bottle) |
note |
Order note for all future orders (optional) | |
total_price |
What the customer pays each time they're billed — the sum of every line_quantity × line_price plus delivery_price. Enter it on the top row of the subscription only (the row showing the club name); values on the other rows are ignored. The importer warns if your figure doesn't match this calculation but doesn't block the import. |
180.00 |
currency_code |
Three-letter currency code. Must be enabled on your store, and the products must have retail prices configured for the row's country in that currency. | AUD |
For Curated subscriptions, each subscriber is a single row. Product selections are determined by the club configuration — you don't specify wines in the CSV.
Filling in the template for each subscriber:
- The template includes a row for each published club / frequency / case size combination. Decide which club each subscriber is in.
- For every subscriber, copy that club's row to the bottom of the spreadsheet — one row per subscriber. Two subscribers in the same club need two copies of the same source row.
- In each copied row, fill in the customer details (
email,first_name,last_name, address,phone) and theirnext_billing_date. - Adjust
delivery_methodanddelivery_priceif the customer collects in person or pays a delivery fee. total_priceis pre-filled at the standard club price after the combination's discount. Change it if you've agreed a different rate with this customer; the importer warns if it looks wrong but doesn't block.- Once every subscriber has their own row, delete the original template rows so they aren't imported as empty subscriptions.
Prices in the template are the discounted club prices (retail price × club discount), not the underlying retail price.
| Column | Description | Example |
|---|---|---|
email |
Customer's email address | jane@example.com |
first_name |
Customer's first name | Jane |
last_name |
Customer's last name | Smith |
club_group |
Club group name (must match an existing club group) | Curated Selection |
club |
Club name — the specific frequency and case size offering (must match an existing club) | 12 Bottles Monthly |
next_billing_date |
Next billing date in YYYY-MM-DD format. Interpreted as midday in your store's timezone. Must be at least 48 hours in the future and no more than one billing interval ahead — up to 1 month for monthly clubs, 3 months for quarterly, 6 months for 6-monthly, and 12 months for annual. |
2026-07-01 |
delivery_method |
Delivery method: shipping, local_delivery, or pickup. Downloaded templates default to shipping. |
shipping |
delivery_price |
Delivery price each cycle. Downloaded templates default to 0 (free delivery). Use 0 for pickup. |
20.00 |
address1 |
Street address | 42 Vine Street |
address2 |
Apartment, unit, or suite number (optional) | |
city |
City or suburb | Barossa Valley |
province_code |
State or province code | SA |
country_code |
Two-letter country code | AU |
zip |
Postal or ZIP code | 5352 |
phone |
Phone number in international format | +61400000000 |
company |
Company name (optional) | |
note |
Order note for all future orders (optional) | |
total_price |
Expected total — the importer warns if this doesn't match the discounted line subtotal plus delivery price, but doesn't block the import. The discounted line subtotal is computed automatically from the club's curated wines and the combination's discount percentage. | 270.00 |
currency_code |
Three-letter currency code. Must be enabled on your store, and the curated wines must have retail prices configured for the row's country in that currency. | AUD |
Pricing and discounts
Imported subscriptions are recorded with the same pricing details as new signups taken through your storefront. Each line stores both the retail price and the discounted price the customer pays, so the customer portal can show the discount and the strikethrough retail clearly.
- Choose Your Own —
line_priceis the price billed each cycle. If it sits below the variant's retail, the difference becomes the per-cycle discount on that line. - Curated — the discount is applied automatically from the club's settings. You don't need to pre-calculate per-line prices.
- Total reconciliation — if
total_pricedoesn't reconcile with the discounted line subtotal plus delivery, you'll see a warning in the test import results. The row still imports.
Multi-currency
If the row's currency_code differs from your store's primary currency, each variant in the row's club must have a retail price configured for the row's country in Shopify Markets. Rows that reference variants without a market-priced retail in the chosen currency will fail with a clear message in the test results.
3. Upload and test
Save your spreadsheet as a CSV file, then upload it to run a test import. The app checks every row against your clubs, products and shipping zones without creating anything.
Validation
The app checks every row before creating anything — there are no partial imports. If a row has an error, you'll see a clear message explaining what to fix. Rows that are duplicates (same customer and club) are skipped automatically rather than treated as errors.
Info
If the import would exceed your plan's subscription limit, you'll see a message with your current count and plan's cap. Upgrade from the Billing settings screen before starting your import.
Test results
After the test import runs, the app shows Test import results — no subscriptions have been created yet. Each row is labelled:
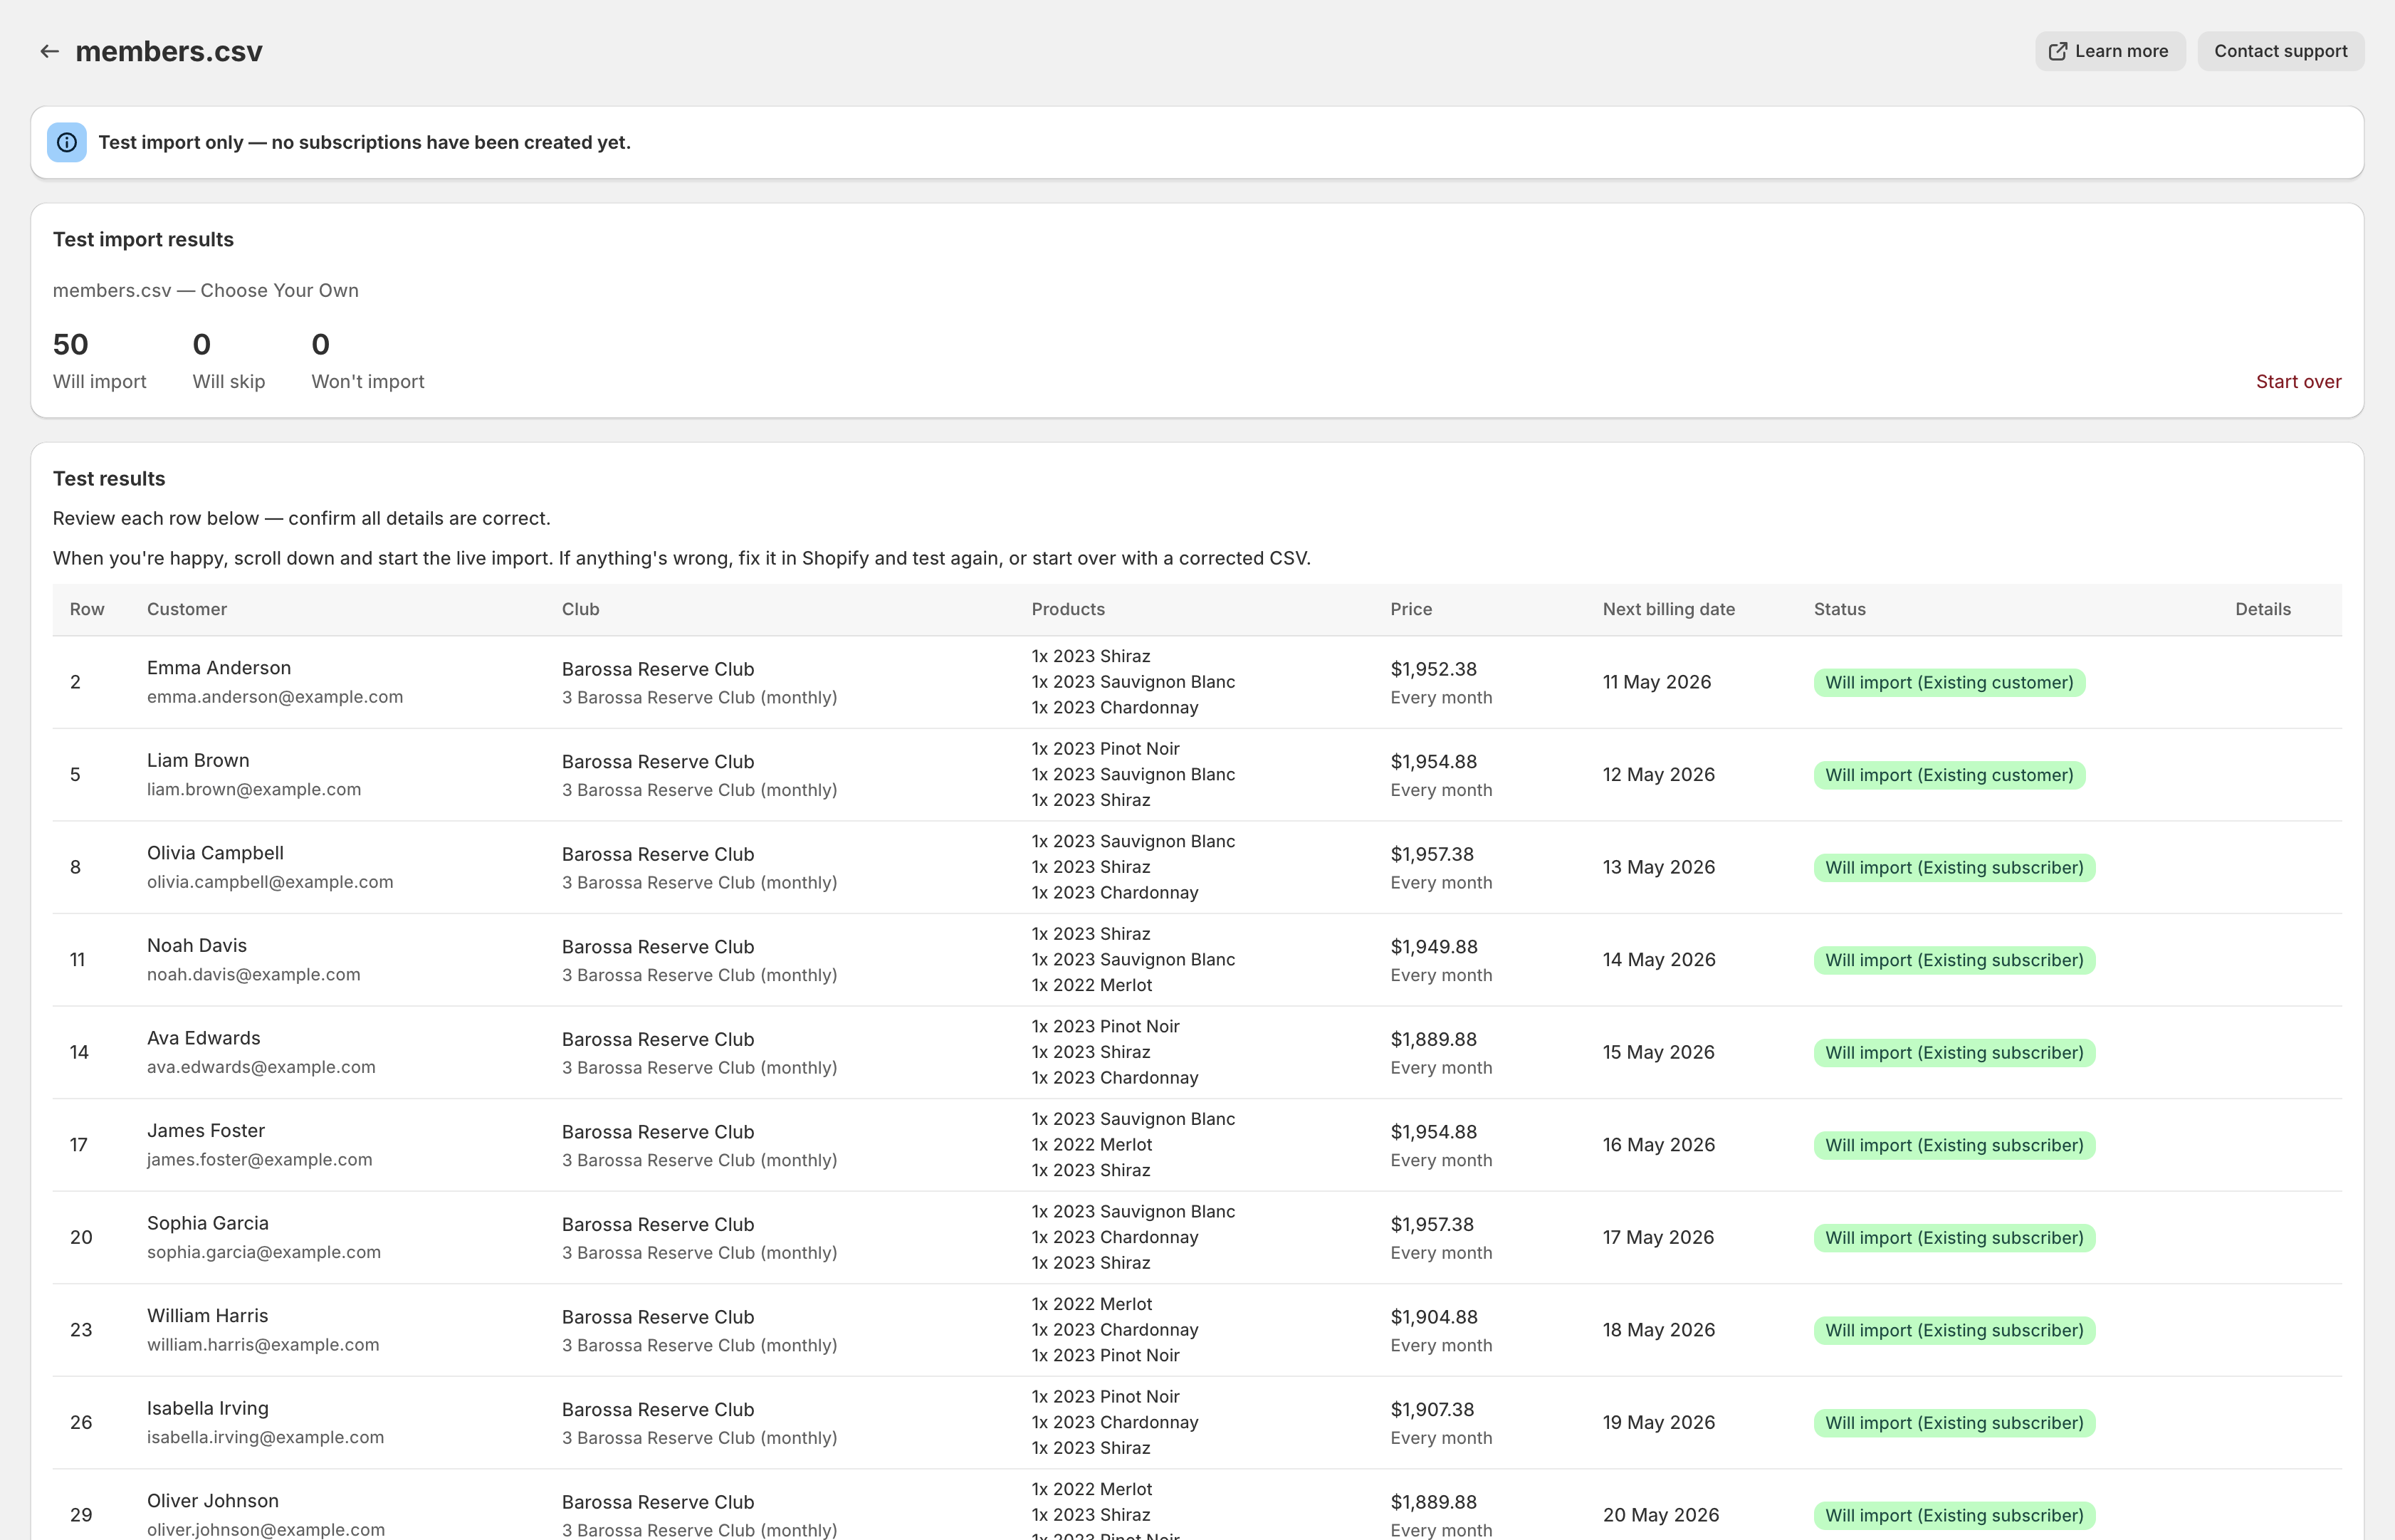
- Will import — Passed all checks, ready to go live
- Will skip — Duplicate row, will be skipped
- Won't import — Has an error that needs fixing before it can be imported
Each row also shows whether the customer is new to Shopify, an existing customer, or already a subscriber.
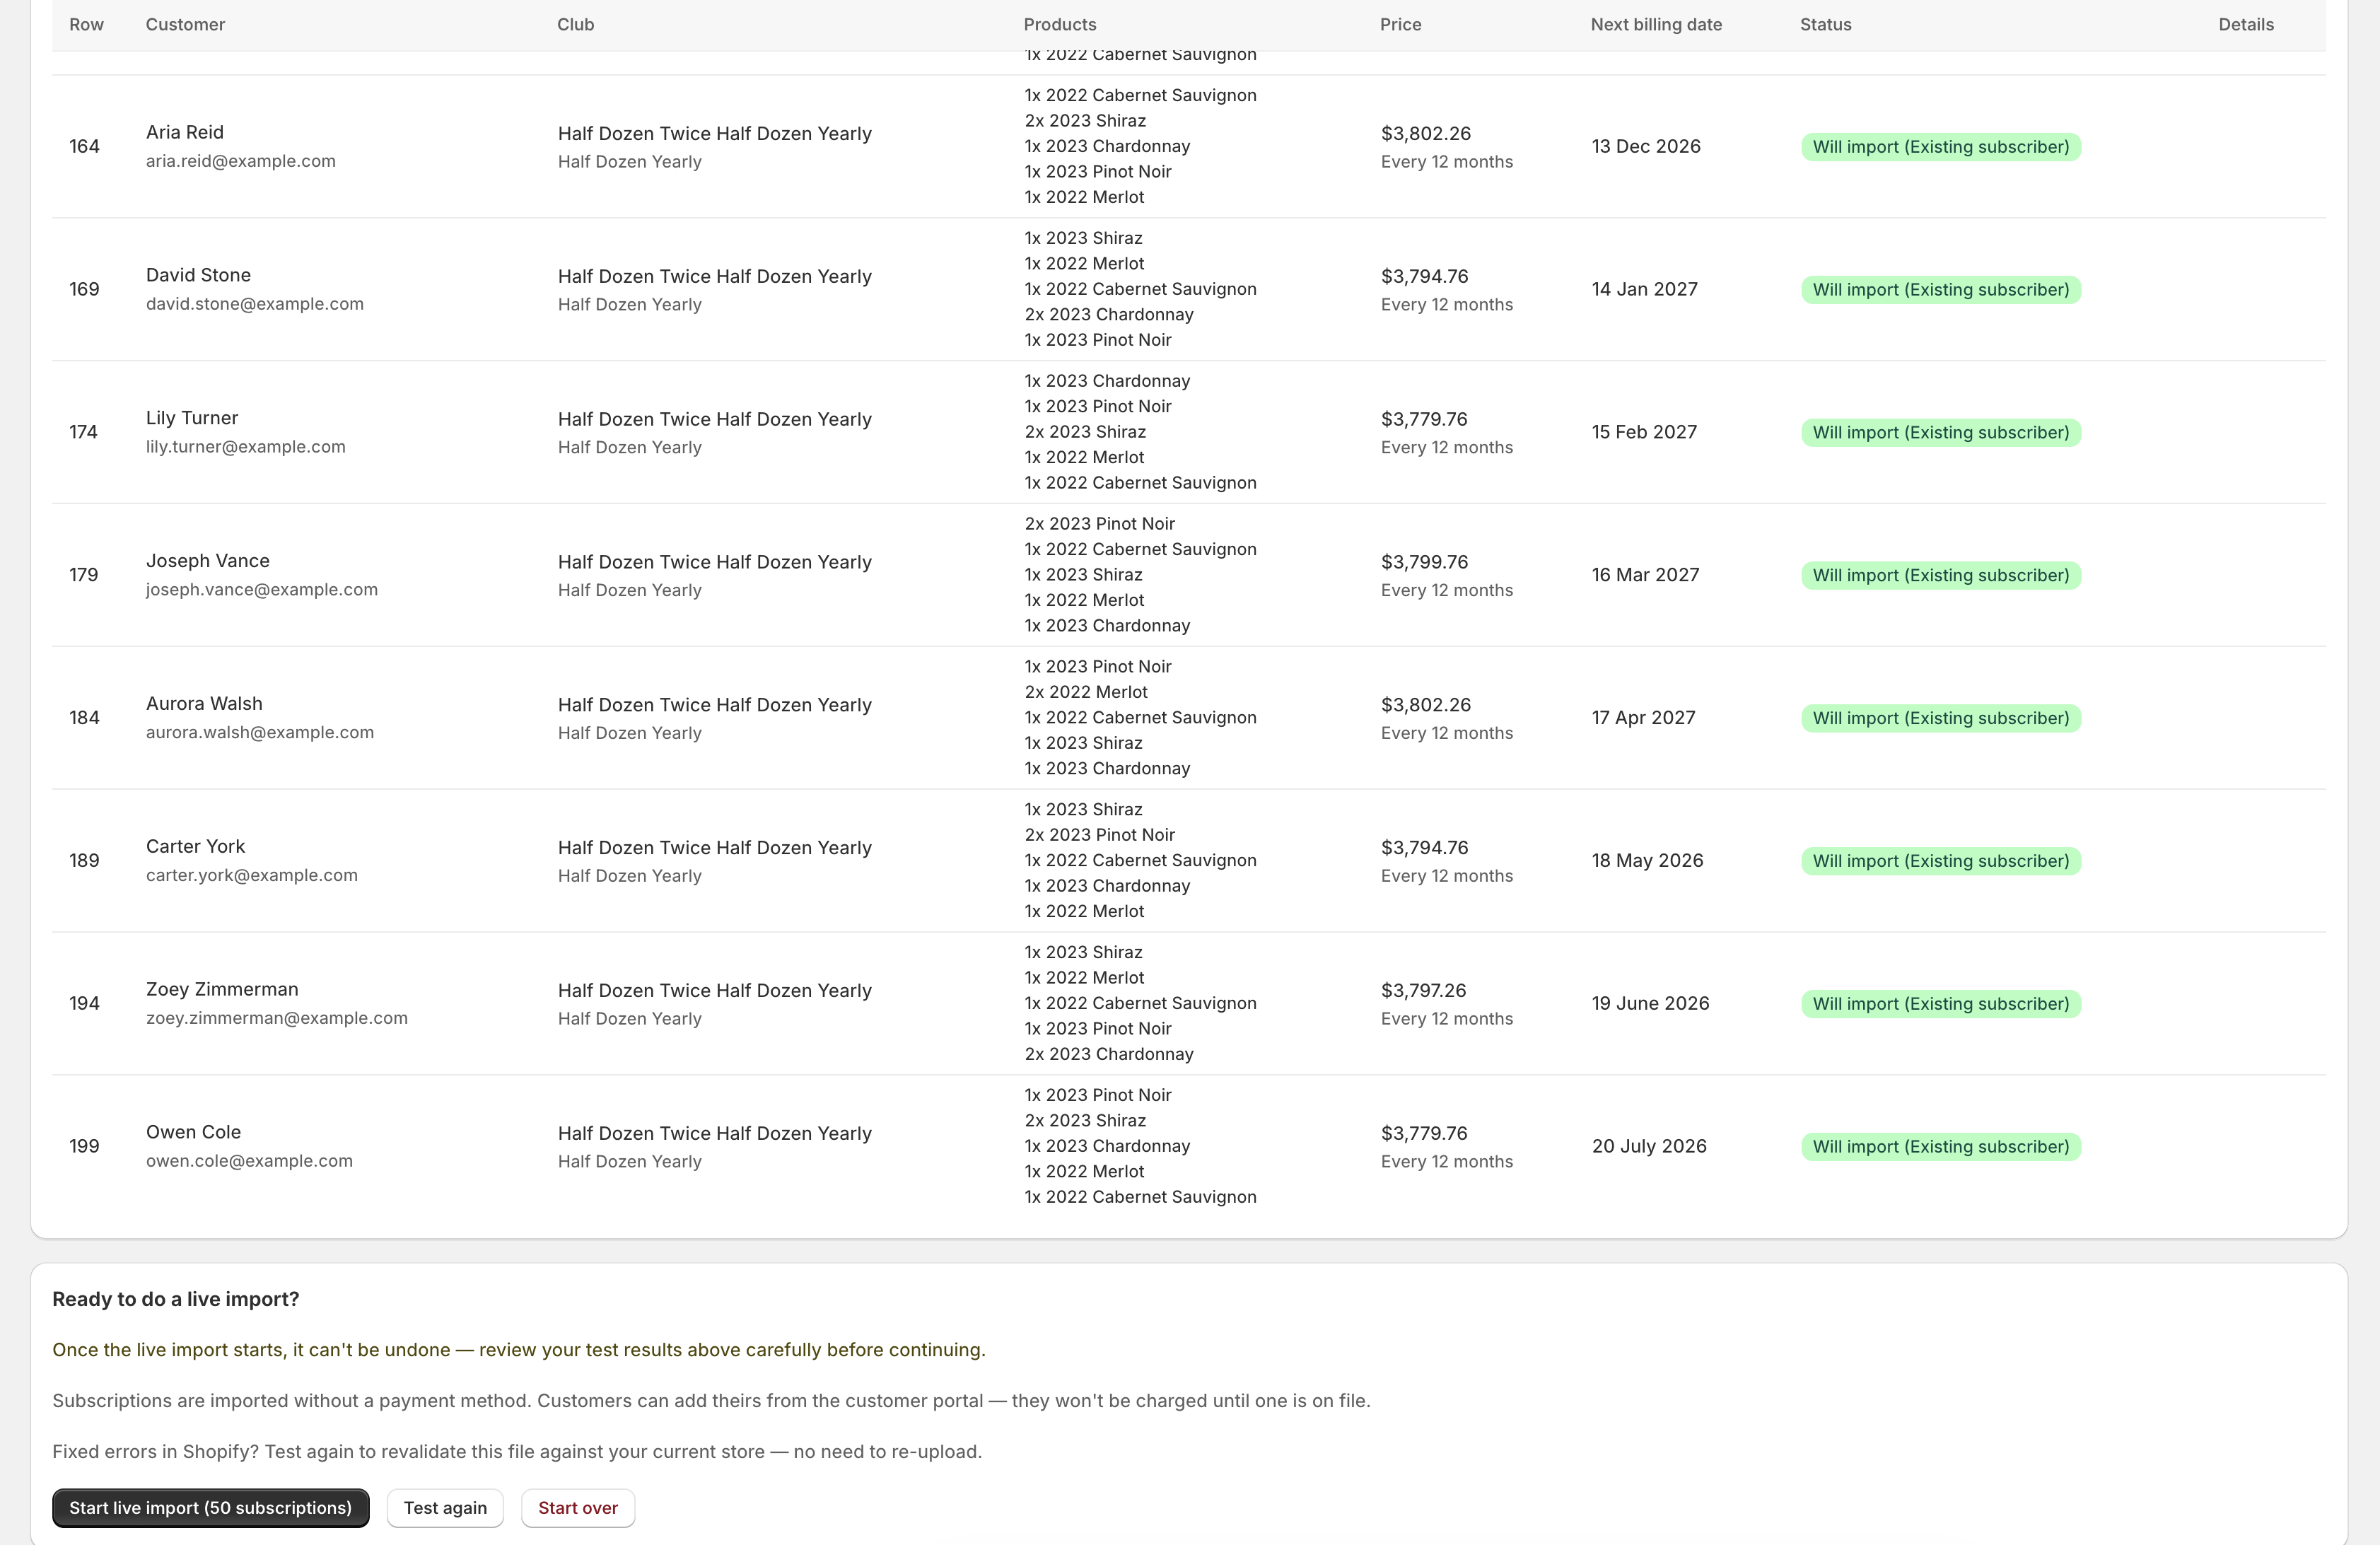
From the test results screen you have three options:
- Start live import — Everything looks correct. Creates the subscriptions for every "Will import" row.
- Test again — Some rows had errors caused by missing data in your Shopify store (for example, a club, frequency, product, or pickup location that doesn't exist yet). Fix them in Shopify, then click Test again — the app re-checks your existing CSV against your updated store and refreshes the results. Rows whose result changed are highlighted so you can confirm the fix before continuing. No re-upload needed.
- Start over — The CSV itself needs editing (typos, wrong dates, missing columns). Discard the test and upload a corrected file.
Which option to choose?
If a row's error message points to something on your store side — "Club not found", "Product variant not available in this currency", "No pickup location matches this address" — fix it in Shopify and Test again. If the error points to the row's data — "Invalid email", "Billing date in the past", "Unknown country code" — edit the CSV and Start over.
4. Start the live import
Once the test results look right, start the live import.
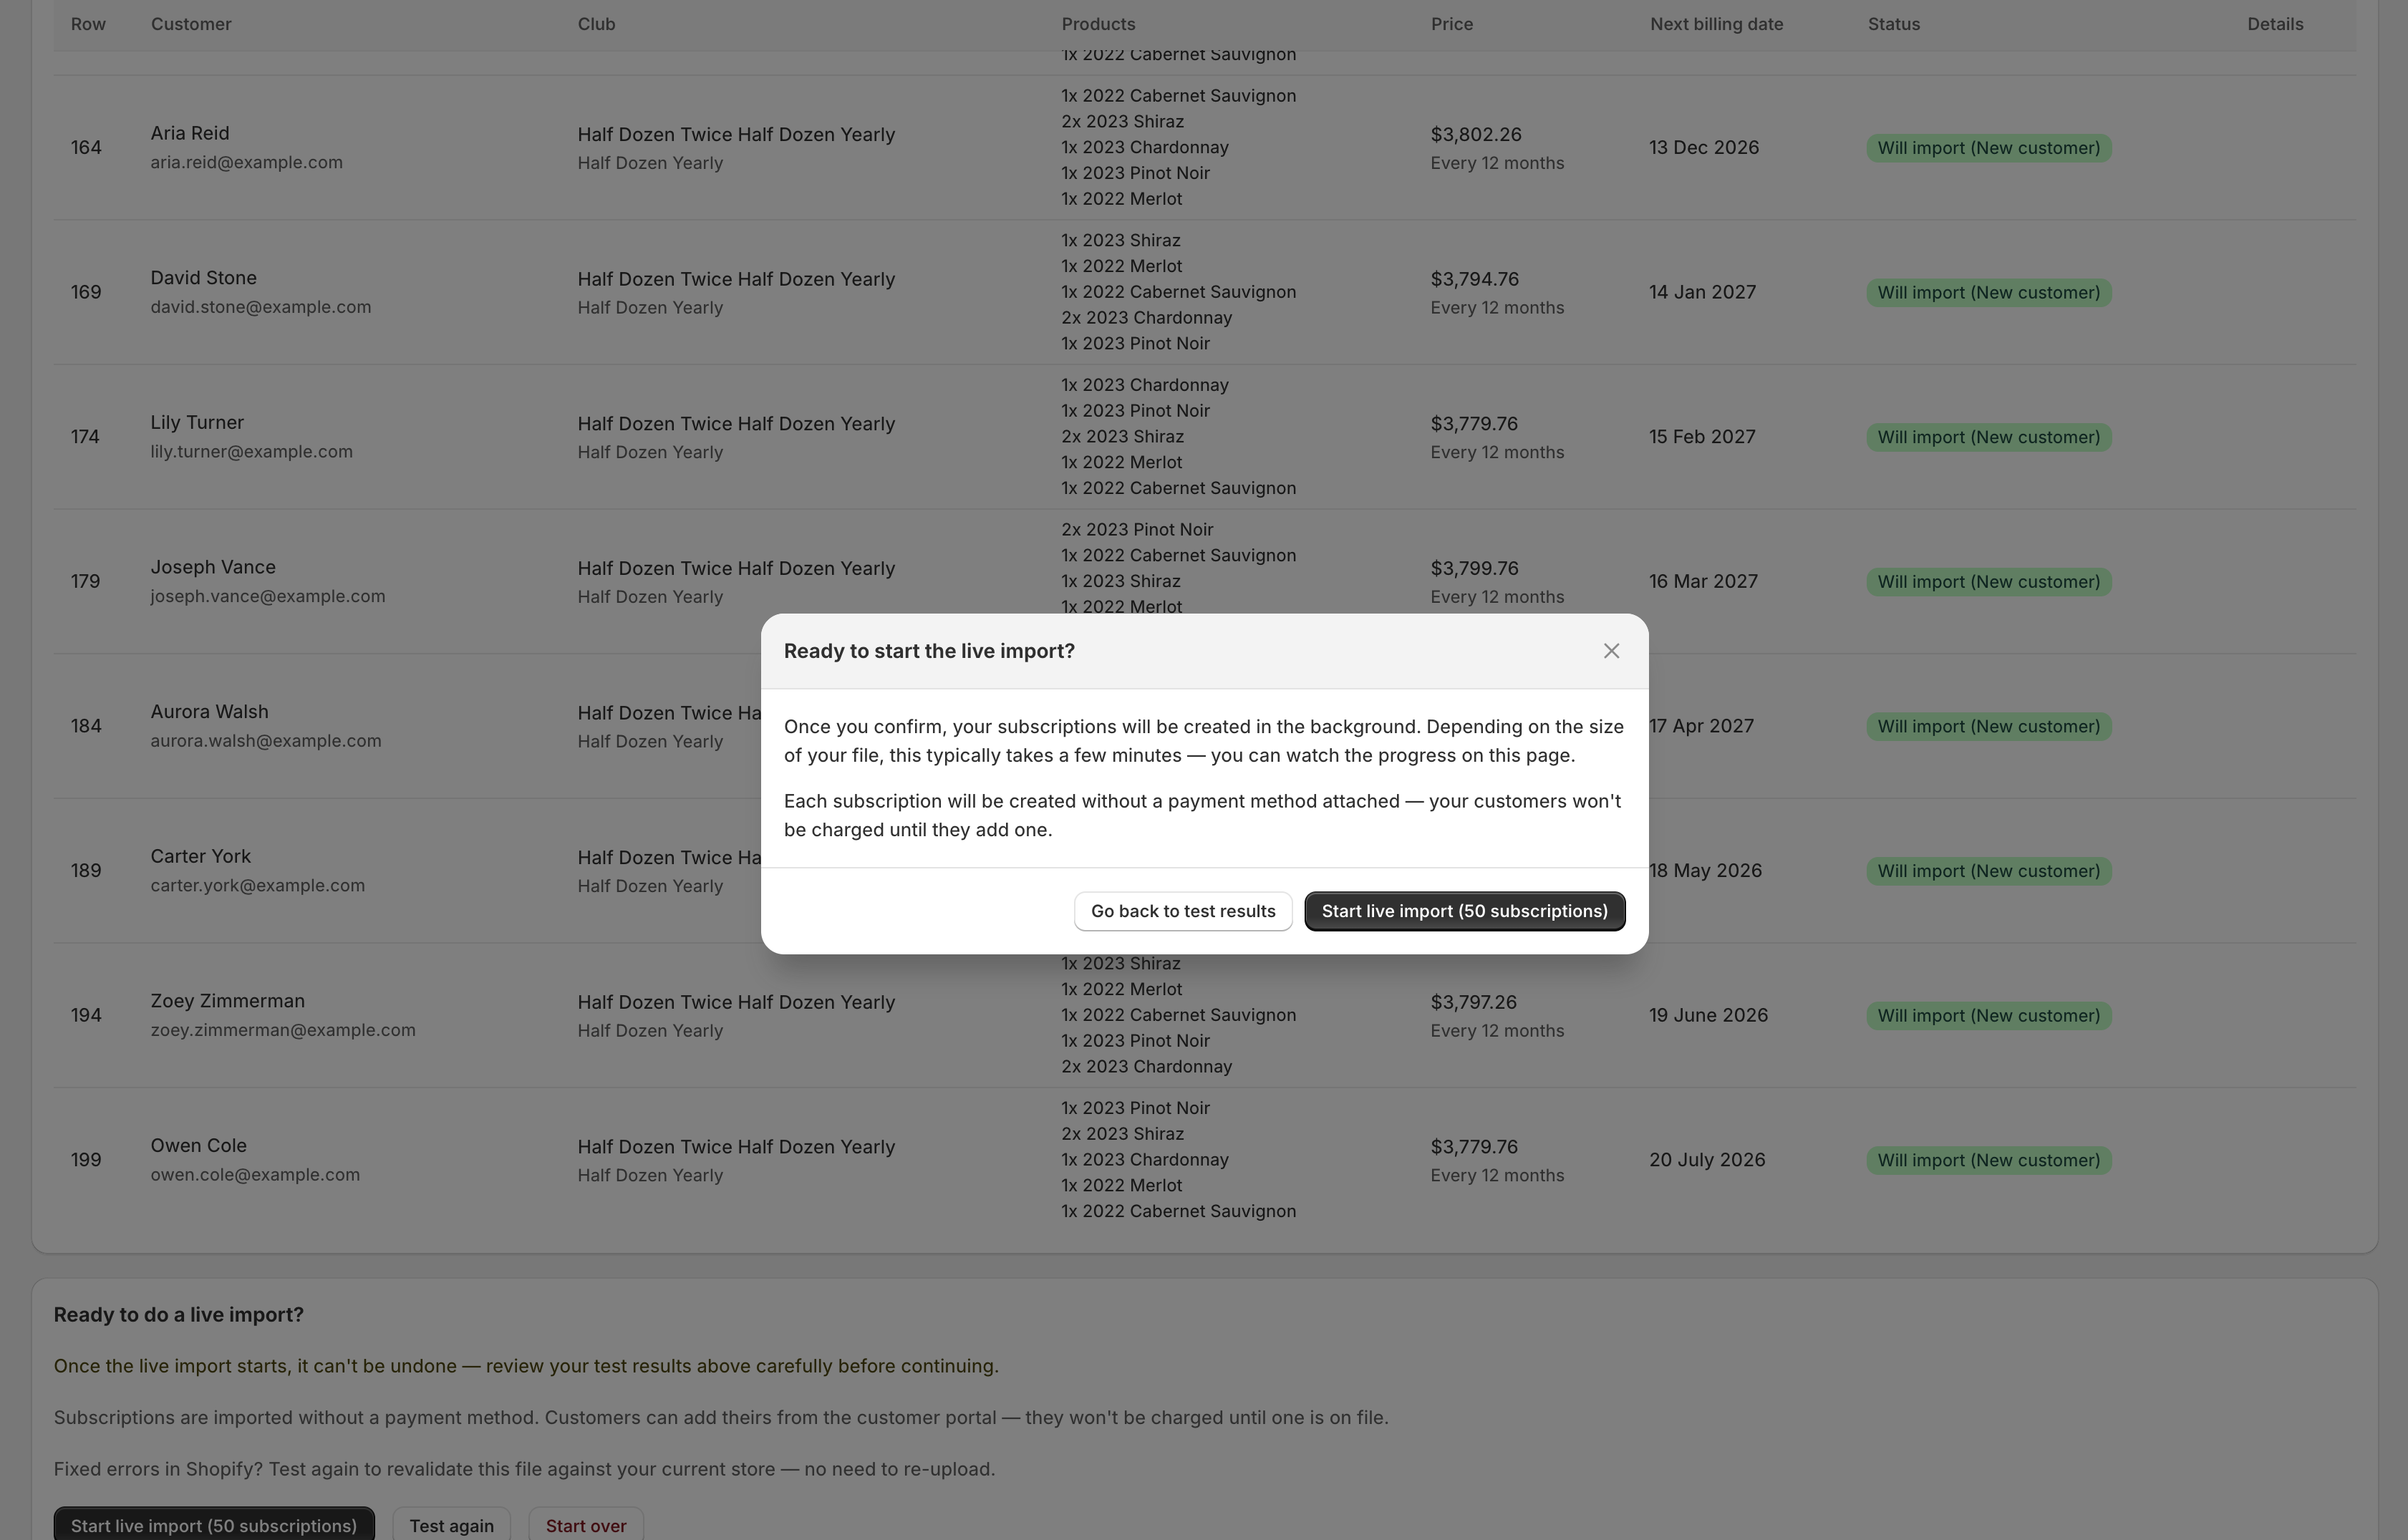
Warning
Once the live import starts, it can't be stopped or undone. To reverse it, you'd need to cancel each imported subscription individually.
The app creates each subscription as Active with the billing date you specified. No charges are made during import — billing begins on each customer's next billing date. If the customer does not already have a payment method on file, they will need to add one before their first billing date (see Payment Methods below).
Note
You can navigate away while the import is running. It continues in the background and you can return to check progress at any time.
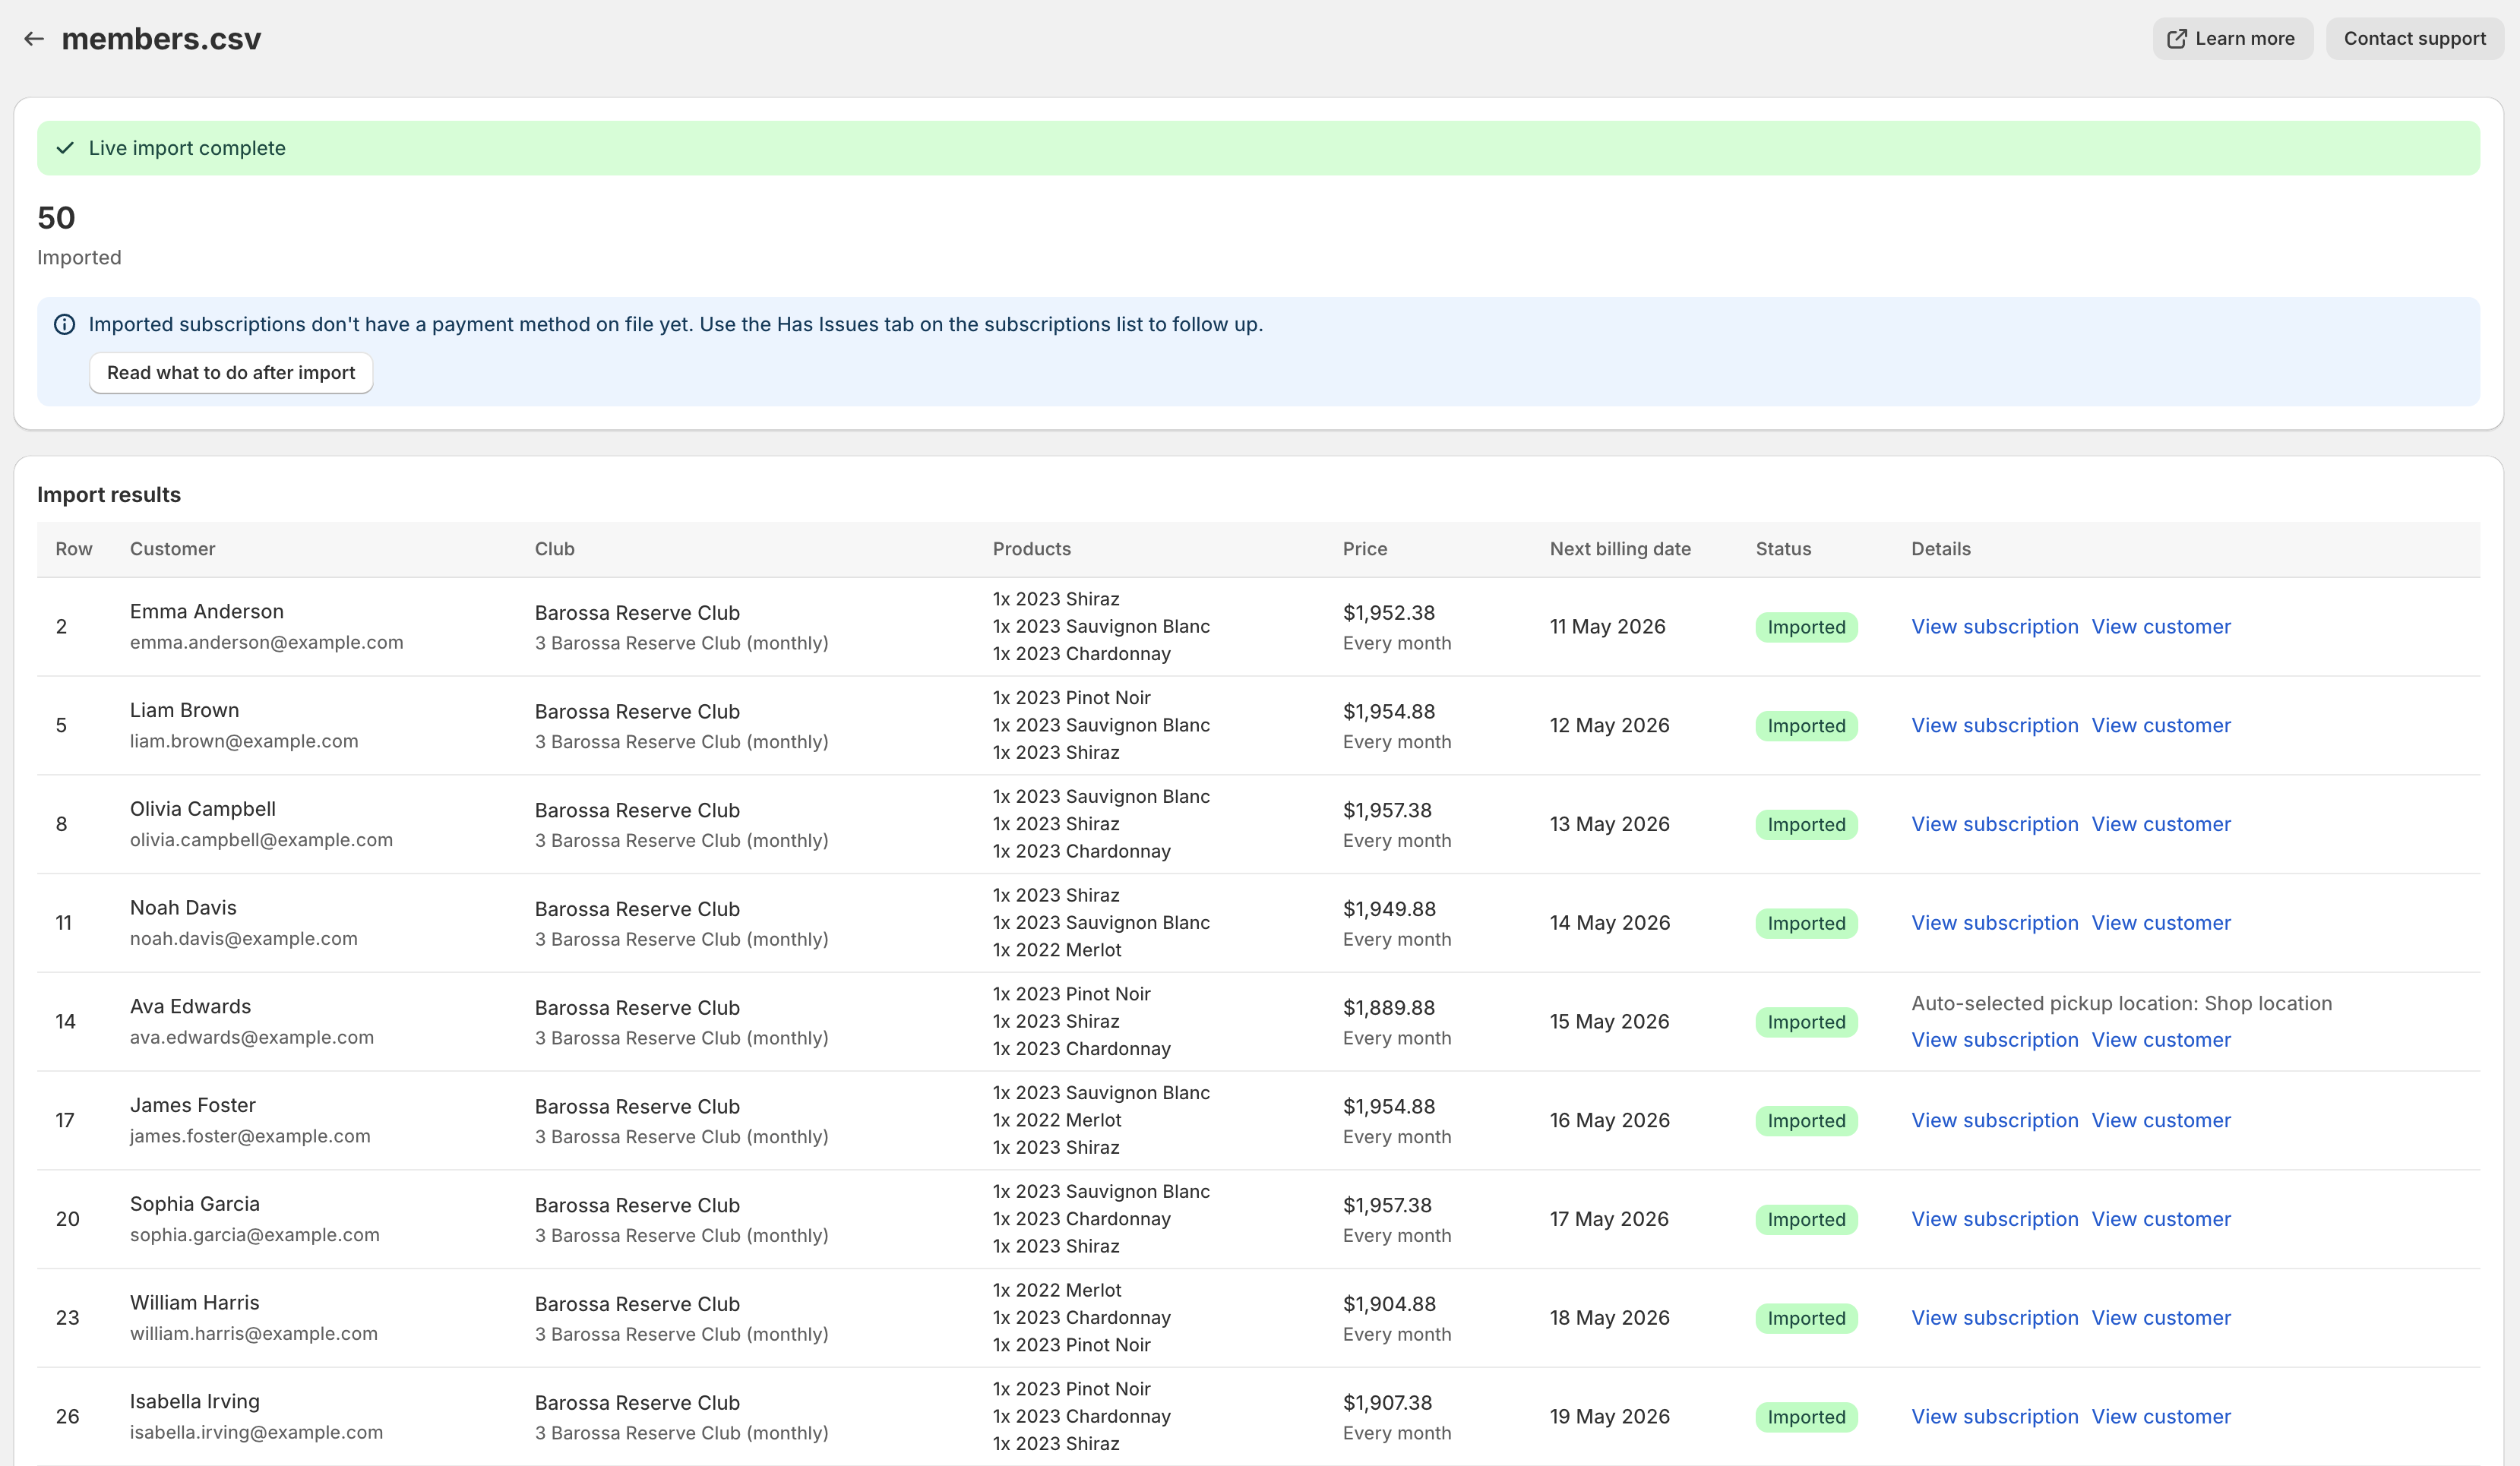
When the import finishes, the screen shows counts for Imported, Failed, and Skipped rows, with a row-by-row breakdown including products and billing frequency.
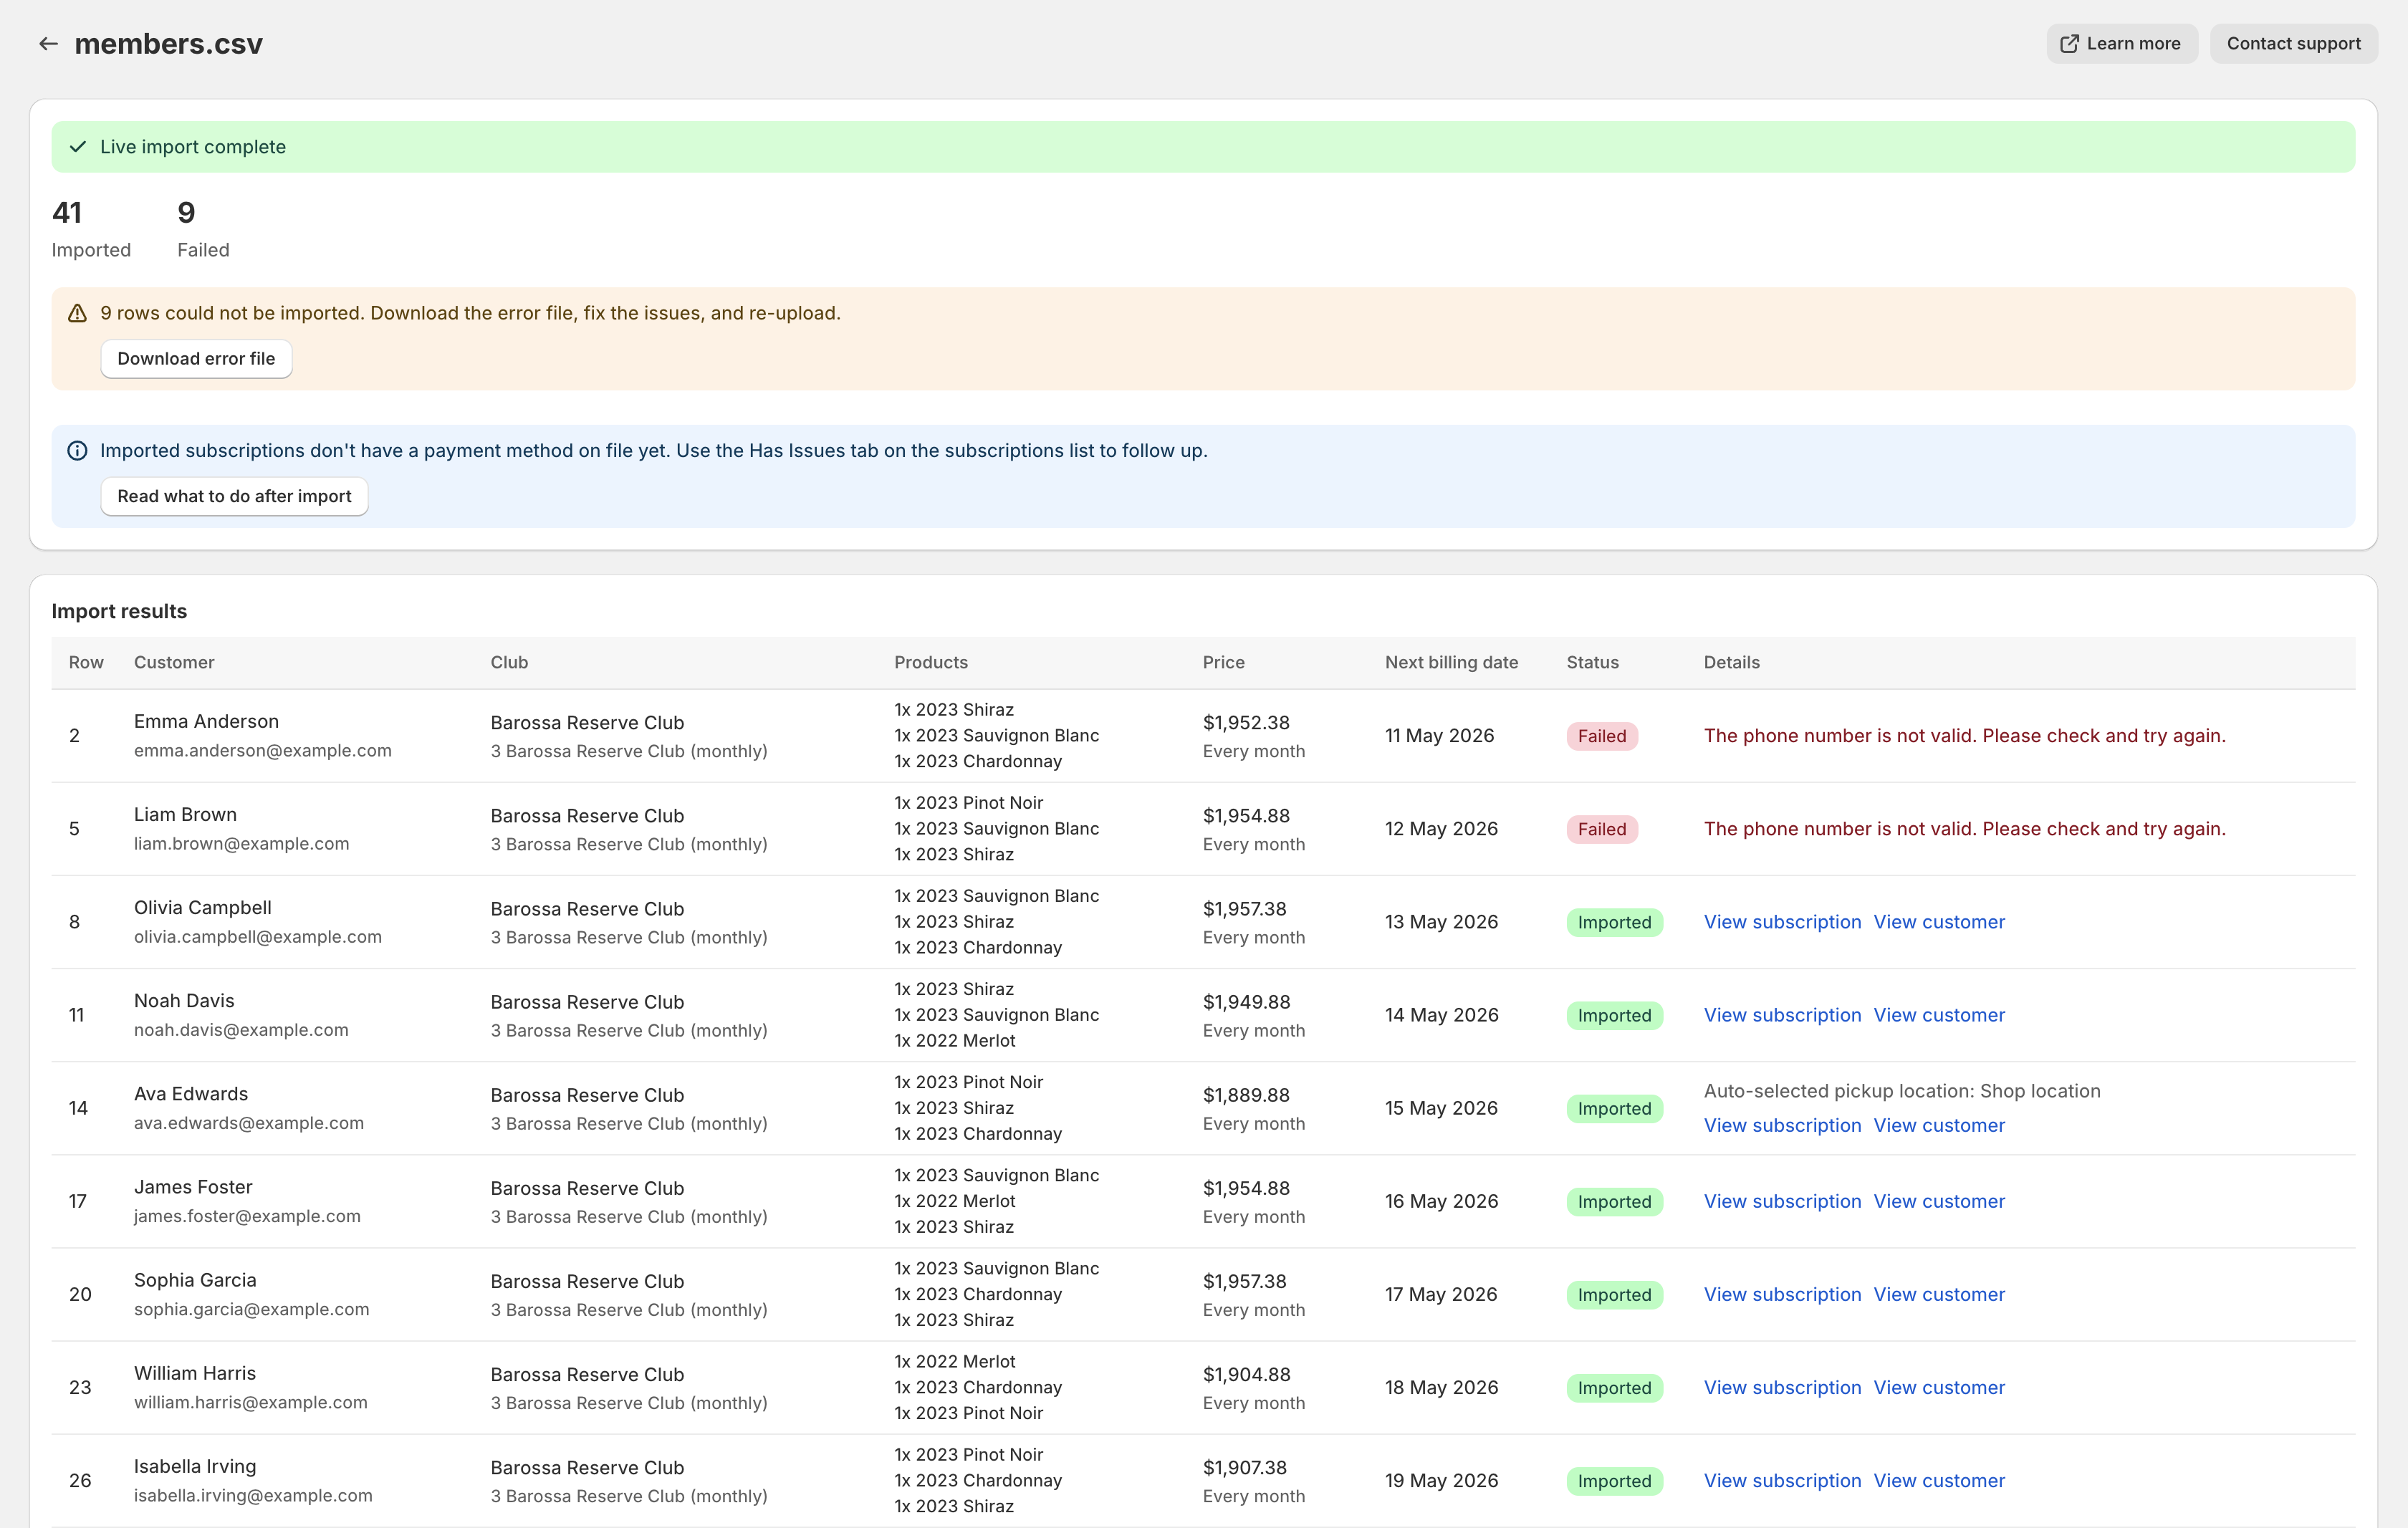
After import
Once the import is complete, your subscriptions are live. Any rows that couldn't be imported can be downloaded, fixed, and re-uploaded.
Fixing rows that didn't import
If any rows couldn't be imported, a Download error file button appears. The downloaded file contains only the subscriptions that weren't imported — failed, invalid, or skipped rows — with an extra errors column on the right explaining what went wrong for each one. Successfully imported subscriptions are not included.
Open the file in Excel or Google Sheets, fix the issues, and re-upload it as a new import. The errors column is recognised and stripped automatically, so there's no need to remove it before uploading.
Payment methods
If the customer already has a reusable payment method saved against their account on your store, the app adds it to the subscription automatically, shortly after the import completes — usually within a minute or two. Customers are matched by email address, so the email in your CSV must match the one on their Shopify account. A reusable payment method is one from a previous subscription (including Shop Pay), or a card the customer has explicitly saved to their account — a card used only for a one-off past order is not stored by Shopify and can't be linked. Otherwise the subscription is created without a payment method. Payment details cannot be brought across from outside Shopify (for example another ecommerce platform), so any imported customer who does not already have a saved payment method needs to add one before their first billing date.
Migrating from another subscription app
Saved payment methods belong to the customer's account on your store, not to the subscription app that created them. If your previous app billed members through Shopify's checkout — as most modern subscription apps do — their saved payment methods, including Shop Pay, are found and attached automatically during import, and members don't need to re-enter their card details. If your previous app charged members through its own checkout or a separate payment system outside Shopify, those payment details never reach your store, so those members add a payment method after import. If you're not sure which applies, check whether the payment method appears on the customer's profile in your Shopify admin.
Prompting customers after import
Once the import completes, open the Subscriptions list and review the Has Issues tab. Any imported subscriptions that still need a payment method appear here, each marked with a yellow warning triangle so you can track your progress at a glance. Select these subscriptions and use the Send add payment method email bulk action to prompt the customers to add one.
You can also email one member at a time: open their subscription from the Subscriptions list and use the Send email action on the "No payment method on file" banner.
We recommend doing this soon after the import so customers have plenty of lead time to add a payment method before their first billing date.
Automatic pre-billing reminders
The standard pre-billing reminders sent 14 days and 2 days before each billing date also prompt customers to add a payment method when one is missing. They act as a backup for any subscriptions you haven't emailed yourself.
Communicate outside the app too
We also recommend telling your subscribers about the migration through your usual direct channels — for example an email newsletter or SMS — after the import. Letting them know that their membership has moved and that they need to add a payment method helps avoid confusion when they receive automated emails from the app.
How customers add a payment method
The "Add a payment method required" email — and the no-payment-method copy on the standard pre-billing reminders — all link the customer to their subscription page in the customer portal. From there, an Add payment method button takes them directly to the Shopify customer account profile screen to add one.
Customers can also add a payment method themselves from their Shopify customer account at any time:
- Log in to their account on your store
- Go to Profile > Payment methods
- Click Add and enter their payment details
Once a customer adds a payment method, it is automatically linked to their imported subscription.
First-time login for imported customers
Imported customers don't need a setup link or password — Shopify's customer accounts use passwordless sign-in (email + a one-time 6-digit code) and provision the account automatically the first time the customer signs in. The links in any of our emails take them through this flow before landing on their subscription page. See Logging in for the full flow, or Shopify's Customer accounts documentation for background on the sign-in options available to your customers.
What happens at billing time without a payment method
If a customer's billing date arrives and they haven't added a payment method:
- The billing attempt will fail
- The customer receives an email notification about the failed payment
- The app's standard payment failure retry schedule applies
- After all retries fail, the subscription is placed on hold (Failed status)
- The customer can add a payment method and reactivate from the customer portal
Managing imported subscriptions
Imported subscriptions work exactly like any other subscription. You and your customers can:
- Pause, resume, or cancel
- Skip orders
- Change items (Choose Your Own clubs)
- Update delivery address
- Update payment method
See Managing Subscriptions for the full list of actions.
Limitations
- No payment method transfer from other systems — If a customer does not already have a payment method saved on your store, they must add one themselves. There is no way to transfer payment information from another system into Shopify.
- One import at a time — You cannot run multiple imports simultaneously.
- No undo — Imported subscriptions must be cancelled individually if you need to reverse an import.
- Billing date must be at least 48 hours in the future — Each
next_billing_dateis interpreted as midday in your store's timezone and must be at least 48 hours away, so the customer's 2-day upcoming renewal reminder fires at least once before the first billing attempt. - Billing date is capped at one interval ahead — Each
next_billing_datemust be within one billing interval of the import (1 month for monthly, 3 for quarterly, 6 for 6-monthly, 12 for annual). If a member's next billing date falls beyond this cap, import them with a nearer date and then move it to the correct date afterwards from the subscription page using Change next billing date. - Month-end billing dates shift later orders to the 1st — Not every month has a 29th, 30th or 31st. For clubs billed every 3, 6 or 12 months, a
next_billing_dateon one of these days means the member's first order arrives on the exact date and later orders arrive on the 1st of the following month; use the 28th or earlier to keep every order on the same day of the month. Monthly clubs simply bill on the last day of shorter months. - Pickup location is auto-selected — For pickup subscriptions, the app queries Shopify for available pickup locations based on the customer's address and product availability, then automatically selects the first available option. The selected location is shown in the import results. If no pickup location is available for the address, that row will fail during import. After import, you can change the pickup location from the admin or customers can change it from the customer portal.